
Archive for October 2016


Sometimes you just want to get something done quick, or maybe you need to get something done as efficiently as possible for a contest or display. Sometimes you need to rush while still maintaining that high quality finish you love. A simple way to remedy this is to paint parts on the sprue.
But wait you might ask, wont I need to clean up the parts after painting when I cut them out? To that I say that is a great question and you are not wrong. I only recommend doing a Primer coat only for this kind of method, and of a similar color of the material to help it along. You can then touch up primer with a small hand brush before Putting together or painting.
 |
| You can see the transition from grey to black with the primer while still on the sprue saving valuable primer |
Now while spraying on the sprue can save time, there are other advantages to spraying on the sprue as well as disadvantages than doing one at a time. Pros -Fast coating of parts to prep for painting -Saves valuable primer to go farther -Primes harder to reach places than if parts were put together -Dries within 20 minutes in a flat even surface ready to cut and put together -consistent primer color across all parts -A easy spot to use a clip to hold the parts in the air leaving no part unpainted. Cons -Clean up required after cutting parts out of the sprue -excessive handling of parts when putting together can get rid of some primer requiring another coat of paint -Any plastic glue used to put parts together melts the paint and does not have as strong a bond -if primer is not coming out well you will have to redo the entire sprue after removing the primer There are alot of cons and pros to using this method, while not the best, it can lead up to quick results. However, there is another painting method that can do multiple parts at the same time and is more effective than this, and more efficient, but that will be another article.
Tag :// 40k,
Tag :// Gunpla,
Tag :// Miniature,
Tag :// Model Kit,
Tag :// Painting,
Tag :// tips,
Tag :// Warhammer
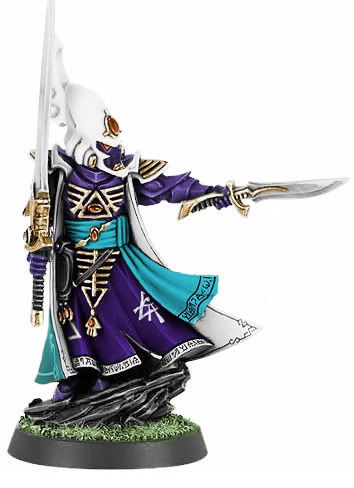
Something I have recently gotten into are little miniatures that can be used for old table top games like dungeons and dragons, pathfinder, and most famously warhammer and warhammer 40k. These small 2-3 inch little figures are packing details comparable to master grades but on a much smaller scale. While I can never justify or will every justify their price (some basic miniatures for 1 single unit cost as much as a HG or MG in some cases, yet only be about as big as a foot from said kit range.) They do help in learning skills to bring over to your kits, specifically MG and PG with how much detail is packed into those.
In this article I'm going to go over some basic skills you learn from miniature as well as how they transition over to gunpla and painting. Here are 6 reasons why miniatures help with gunpla and why you should give it a try.
1. Removing seam and mold lines.
In most if not all miniatures you will see some small mold lines (small lines of plastic) on the kit that are out of place and all in the same spot all over the model. This is something that will always happen on molds when a kit is made as part of the forming process. These lines are simple to remove and fix with just a knife gently scraping in the same direction of the line. A little scrape and some light sanding will fix these up.
While not as prominent on gunpla kits you will still see these from time to time, most notably on the hands, fingers, and poly caps. You can use the same method above to fix, though more sanding may be required. If the kit is a meki plated kit however, you will need to repaint to fix this. While newer kits are better at hiding seam lines from molding, you still get seam lines when putting multiple parts together that require glue and work to fix.
2. Thinning your paint!
This is perhaps the most important thing you can learn from this is layering and thinning your paint. Since these things are small, it helps to have your paint as thin as possible so as to not obscure details. It is OK if the first layer of paint does not cover the bottom most layer with how thin it is. Let it dry then go over again with a second layer to fully cover the spot as thin as possible. With miniature paints, its typically 2 parts paint 1 part water, to make it nearly milky, kind of like if you were airbrushing. Not so watery the paint runs but not so thick that it covers everything.
This skill helps a lot when your doing airbrushing. Even regular hand painting when you get to those super detailed kits. It teaches you when your doing too much paint and till little. Its better to have multiple thin layers with more work than 1 thick layer with no details.

I hope this little Mini guide has helped you guys out with showing some benefits of miniature painting and how those skills can transfer over to your gunpla. I will Start doing some work in progress pics and reports on some minis every now and then as well as basic tutorials on them from what I have learned, all to bring over skills from that to gunpla and vice versa. I hope you guys will enjoy this and I can't wait to get started.
In this article I'm going to go over some basic skills you learn from miniature as well as how they transition over to gunpla and painting. Here are 6 reasons why miniatures help with gunpla and why you should give it a try.
1. Removing seam and mold lines.
In most if not all miniatures you will see some small mold lines (small lines of plastic) on the kit that are out of place and all in the same spot all over the model. This is something that will always happen on molds when a kit is made as part of the forming process. These lines are simple to remove and fix with just a knife gently scraping in the same direction of the line. A little scrape and some light sanding will fix these up.
 |
| The mold lines from the kit as it was created. Notice the lines up and down the armor as well as the excess plastic sprue |
 |
| Older gundam kits have noticeable seam lines like this that can be removed from glue and sanding. |
2. Thinning your paint!
This is perhaps the most important thing you can learn from this is layering and thinning your paint. Since these things are small, it helps to have your paint as thin as possible so as to not obscure details. It is OK if the first layer of paint does not cover the bottom most layer with how thin it is. Let it dry then go over again with a second layer to fully cover the spot as thin as possible. With miniature paints, its typically 2 parts paint 1 part water, to make it nearly milky, kind of like if you were airbrushing. Not so watery the paint runs but not so thick that it covers everything.
This skill helps a lot when your doing airbrushing. Even regular hand painting when you get to those super detailed kits. It teaches you when your doing too much paint and till little. Its better to have multiple thin layers with more work than 1 thick layer with no details.
 |
| There are at least 3 different colors on the bottom plate with nearly 10 layers of thin paint. |
3. Learning to pain in small tight areas
Probably the second most important skill is learning on how to paint very small very detailed areas, usually in a location not easily accessed. Most warhammer kits are packed with details on details on details. The issue is, most of those are in layers that are very difficult to hit. When you have the right brush even the most detailed spots can easily be painted
Probably the second most important skill is learning on how to paint very small very detailed areas, usually in a location not easily accessed. Most warhammer kits are packed with details on details on details. The issue is, most of those are in layers that are very difficult to hit. When you have the right brush even the most detailed spots can easily be painted
This can help you learn on how to paint details on the inner frames of master grades like the Ball ver ka where all detail is in the inner frame unpainted, or for even sections of armor that require multiple colors but are too small to airbrush.
 |
| The ball ver ka is a simple kit until you look at all the detail packed on the inside which requires paint. |
4. Brush maintenance
Paint brushes are expensive. It doesn't matter the brand, buying a single brush can run you anywhere from $4 to $30+ a brush! That's insane however it also depends on the type of hairs on the brush and the quality. With how much your spending on brushes you will want to maintain them. While there are multiple methods to cleaning brushes and maintaining them, I will clean my brush after each color till all the color pigment is out as well as when I'm done painting for the day ill clean the brush with some brush cle
5. Working with paints
Not all paint works with each other. Some paints work great with other brands, while others will eat away or ruin the underlying paint. The only way to truly know what paints works best with each other is by experimentation. Minis have quite a bit more the range of paint types than compared to other model kit paints like tamiya or MR. hobby, focusing mostly on acrylics, but it will help you with mixing colors and working with colors on each other I feel is the best take away from this. Ill have a more detailed blog on paints later on what works best, but minis also help with finding your own custom colors for your kits.
 |
| My current miniatures stand with most of my miniatures paints and airbrush paints. |
6. Customization
By far I think this is probably the most important thing you can take away from this, more so than thinning your paints. Its learning that you can customize what you want. Some people may want to bite you for not going with official lore colors of said miniature piece, or the army of that part (this is very true with warhammer and games workshop folks, if its not official people tend to get nasty. Get friends that don't bite like this) but if you like the colors, Then go for it. You can bring these custom colors over to your gunpla as well. Don't want a red samurai musha gundam? Make it pink and purple. Want a neon orange zaku? Go for it. Customize them as you want take parts from other kits and put it together. Gunpla and miniatures is all about fun with customization, and that's is what I think is the most important lesson you can learn.
 |
| If it wasnt for minis I wouldnt of attempted to customize my Zeong! |
One question I tend to get a lot is what grade is this kit, or what scale is this other kit in when people come to look at my gunpla collection, or when someone is asking what should I start with as my first gunpla. Well Today Im going to explain the difference in scales and grades and what the differences between all of them are.
Bandai that has manufactured gunpla has set the standard for categorizing difficult and size in 2 ways that other companies like kotobukiya uses- Scale and grade.
Grade determines the complexity of the kit as well as the amount of parts and runners on the kit, as well as the amount of details on it. While most grades have a standard scale with them, there are a few that defy this logic but they are few and far in between. Bandai has also streamlined the grades to 2 letter abbreviations so that you know what type of kit it is from the box itself.
Sd: Super deformed kits are made to look like tiny robots in small cute sized packages. These models tend to be the cheapest and smallest, as well as having the least amount of plastic quality, articulation and details. These require stickers and lots of paint to make color accurate, and tend to come with 2-4 runners.
SDEX: SD ex standard is a new line of SD kits released as of late 2015 that are of the same size as normal SD kits, but come with the benefit of more articulation and the gimmick of weapons able to be combined with their HG counterparts.
HG: High grades are the most common gunpla kits around. This line started in 1990 as bandais most complex models and has gone through several revisions throughout the years. This line has the most variety of kits of all the grades. If a mech exists in the gundam universe, it will be in the HG line (with some exceptions) These models need some paint to make anime accurate, but have a wider range of movement compared to SD kits. Today they are not considered complex and are great for starters.
RG: Real grade kits are a line of kits started in 2010 to bring the detail of the master grade kits to the HG audience. These kits feature a inner skeleton to offer more possibility than their regular HG counterparts while featuring more details and decals equivalent to their MG counter parts. These kits don't tend to be harder than high grade, but smaller parts can be a bit trickier to handle.
RE: REBORN 1/100 kits were first introduced in 2014 with the Nightingale Kit from Mobile Suit Gundam: Char's Counterattack - Beltorchika's Children. A side story that had this and hi nu gundam instead of the regular sazabi and nu kits. While not as many kits are in this category, it does help bring out kits that are too obscure, too large, or too expensive to have become full master grade kits. The outer detail of the kits are that of a MG while the parts themselves are that of high grade in complexity, leading to large parts for assembly. This is a good in between for master grade and High grade.
MG: Master grade kits are intricate kits released in 1995 that are in 1/100 scale, introducing screws and metal parts to bring them closer to life. These kits tend to be in the middle range of price from $30 to about $100 depending on the kit and amount of plastic. Kits in this line tend to have 1-2 variations in the HG line before they get a master grade, or are a evolution of older MG kits from before. These also tend to get the most exclusive kits and variants than any other line, known as pbandai that are only released once. These kits need very little painting to make anime accurate and offer some of the best flexibility of any kit, even with articulated fingers on the kits.
PG: Perfect grade kits are the most accurate and most expensive kits you will ever see and purchase. Introduced in 1997 with the evangelion test type suit before moving to gunpla exclusively, these kits tend to have a significant amount of internal and external parts, metal parts and light up gimmicks. All pg kits also get Pbandai variants and exclusive, and even expansion packs for the kits. Perfect grade kits have sometimes been used to create MG and even RG kits. These kits are the most expensive but worth the price and effort to put together.
NG: No grade kits tend to have low quality plastic in their construction and tend to be on much older kits, or 1/100 kits that are not MG. This is also used for non bandai kits though for others they can be of high quality plastic depending on the company.
Scale determines the size of the kit as it would measure up in terms of its Real life counterpart. Scale however is not always determined by grade as most people think. Scale is just a representation of the size of the kit, not its difficulty or parts.
1/144: The normal scale for kits, these tend to be reserved for HG and RG kits. The size of these kits tend to be around the size of a small paper cup (though there are a few exceptions). This scale can also be used on mobile armor suits that are too big to make in any other scale (the most famous being the neo zeong and the Dendrobium.
1/100: This scale is seen on all MG kits and RE kits. Some HG kits and no grade kits are in this scale as well, most notably older kits from the early 00s and 90s. These kits tend to be about the size of your average anime figure or the size of a small book.
1/60: A Kit of this size tends to be about as big as a small house cat. These kits are almost exclusively reserved for PG but from time to time HG and no grade kits can reach this size.
No scale: Kits in this scale may not be 100% accurate in proportion to their rl counterparts or are difficult or in a different scale that can not be put in the normal scales. This does not determine the quality of the plastic, but can tend to be in the NG quality. SD kits are exclusive to this scale.
There is a new line of kits that started getting release as of 2016 known as Figure raise busts that are bust model kits of characters from the gundam franchise, notably the pilots of said mobile suits. The figure raise type kits have been around for a longer time for things like dragon ball z starwars and other media though their scales tend to range from 1/20 to 1/8.
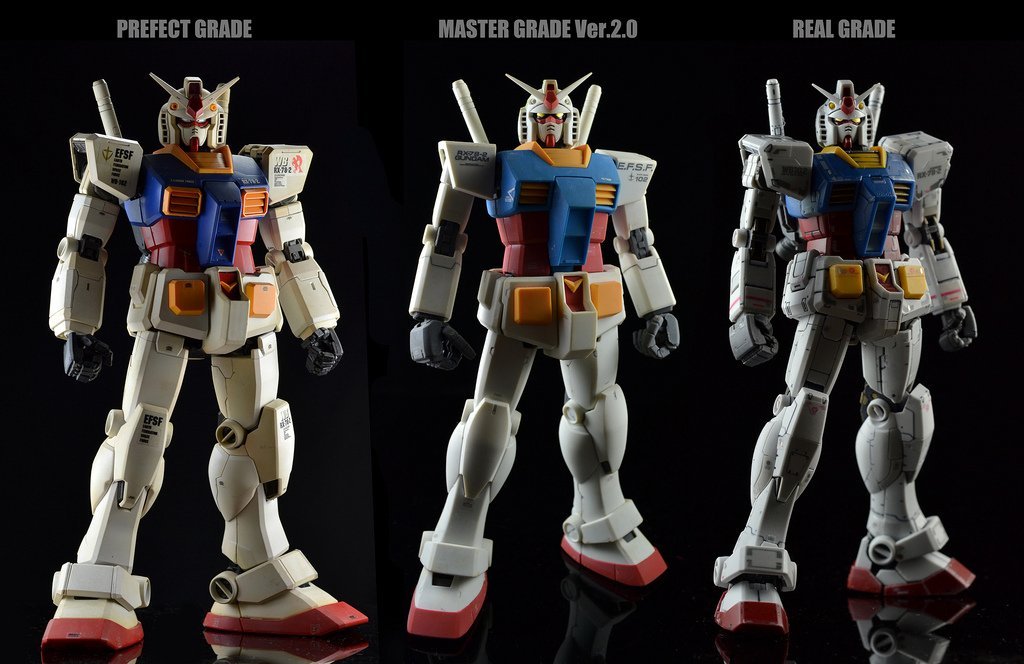 |
| A comparison of the difference between the 3 major grades. |


